Is Unity Easy to Use for 2d
Update note: Ben MacKinnon updated this tutorial for Unity 2020. Sean Duffy wrote the original.
Unity is an extremely popular and versatile game engine that has a long list of supported platforms and devices to its credit. 3D games may be your first thought when it comes to Unity. The engine even used to be referred to as Unity 3D! However, a large portion of mobile, console and desktop games are presented in 2D, so it's important to understand the features Unity provides for building 2D games.
In this tutorial, you'll build a 2D space lander game and learn the following skills along the way:
- How to work with sprites and the camera.
- All about Physics 2D components and how to handle collisions and gameplay.
- How to set up 2D animation and states.
- How layer and sprite ordering affect a 2D game.
The materials for this tutorial were built in Unity version 2020.3. You can get this version from the Unity downloads page.
Note: If you're new to Unity, you can read our Introduction to Unity tutorial to get up to speed.
Getting Started
Download the materials for this tutorial by clicking the Download Materials button at the top or bottom of the tutorial.
Extract the contents. Then, open the starter project in Unity.
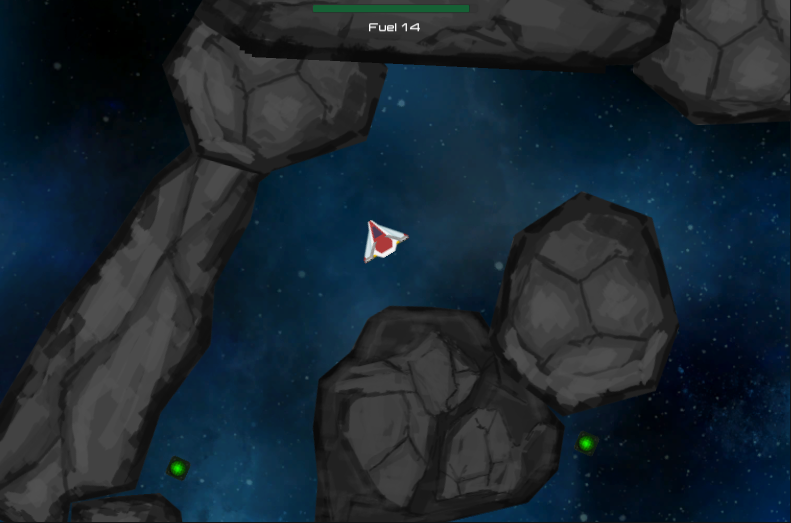
Open the Lander scene located in the Scenes folder of your Project window. You should see something similar to the following in the Game view:

You may not see the exact same picture because of sprite sorting, which will be explained later in this tutorial. The starter project is a functional 2D space lander game, but it has a few problems you'll need to solve before you can truly call it finished.
Ready for lift off and a perilous journey down to the closest landing pad? Time to get started!
Note: 2D games in Unity — quite logically — use the 2D mode of the Unity Editor. You can choose 2D or 3D mode when you create a project from scratch. This option has already been set in the starter project for you.

Sprites in Unity
At a high level, Sprites are simply just 2D Graphic objects. They are essentially standard textures you would usually use for 3D objects. However, Unity has special techniques for combining and managing these sprite textures to get super efficient performance in your games, as well as a convenient development experience.
In a nutshell, Sprites are easy to work with in Unity, thanks to a great 2D workflow and built-in editor.
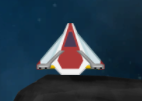
To add a sprite to your game, drag and drop it from your Project folder into your Scene view. To see for yourself how easy the process is, first select the Scene view. Then, drag the playership sprite from the Sprites folder into your Scene view:

In the Hierarchy, click the playership GameObject Unity created for you and look at its details in the Inspector. Notice that Unity automatically attached a Sprite Renderer component, which contains your playership sprite, to the GameObject:

That's all it takes! The Sprite Renderer lets you display images as Sprites in both 2D and 3D scenes.
Now, delete the playership GameObject from the Hierarchy.
Sprite Modes
Click a sprite in the Assets / Sprites folder. In the Inspector, there are three different modes in which you can use sprites:

- Single: A single-image sprite.
- Multiple: A sprite with multiple elements, such as animations, or spritesheets with different parts for a character.
- Polygon: A custom polygon-shaped sprite that you can create many different types of primitive shapes with. Examples: triangle, square, pentagon, hexagon.
A spritesheet is a single image that contains lots of smaller individual images, like so:
![]()
The reason for using spritesheets is that every image you use in your game will take up one draw call. For a few dozen sprites, this isn't a big deal, but as your game grows in complexity and scope, this could be a potential issue.
By using spritesheets, you're making one draw call for lots of Sprites, thus giving your game a performance boost. Of course, organization of your spritesheets is just as important as using them, but that's for another tutorial!
Sprite Editing
It's convenient to pack multiple graphic elements into a single image for animations or objects that have lots of moving parts; Unity makes it easy to manage these spritesheets with a built-in 2D spritesheet editor.
You'll use two spritesheets in this game: one for the lander's thruster animation, and one for an explosion animation. Both of these animations consist of multiple frames, which you can edit and slice using the Sprite Editor.
Assets/Sprites/Explosion/explosion-spritesheet.png has already been sliced and prepared into an animation for you, but Assets/Sprites/thruster-spritesheet.png still needs some attention.
![]()
Slicing Spritesheets
Click Assets/Sprites/thruster-spritesheet.png in the Project window. In the Inspector, the Sprite Mode is already set to Multiple (if not, change it, then click Apply).
Next, click Sprite Editor:
![]()
In newer versions of Unity, the Sprite Editor isn't installed by default; it's moved into the package system and needs to be added.
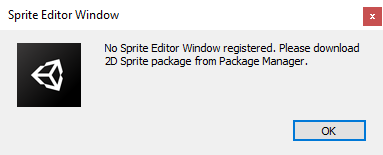
This warning appears the first time you try to open the Sprite Editor.
Go to Window ▸ Package Manager. Select Unity Registry from the Packages drop-down, and find 2D Sprite. Click Install to add the tools to your project.
![]()
Go back to thruster-spritesheet.png and click Sprite Editor again. A new window pops up to show the spritesheet automatically sliced into individual frames (the numbers were added for illustration purposes and aren't part of the screenshot):

Click Slice in the upper-left corner of the window, noticing Automatic is the default slice operation:

This means Unity will attempt to locate and slice your spritesheet on its own to the best of its ability. In this scenario, it'll work just fine, but you could also slice your spritesheet by cell size or cell count.
Custom Slicing
Selecting the cell size option lets you specify the size of each frame in your spritesheet using pixel dimensions.
Click Grid by Cell Size under the Slice menu in the Sprite Editor:

Under Pixel Size, enter 9 for X and 32 for Y. Leave the other values at 0 and Pivot set to Center. Then, click Slice:
![]()
Click Apply in the Sprite Editor window to apply the changes:
![]()
You're done! Your thruster spritesheet is now ready to use, and you can close the close the Sprite Editor.
Assigning Sprites to the Lander
Right now, you can't actually see the lander in your game. That's because it doesn't have any Sprite Renderer components attached. There won't be any spectacular landings – or crashes! – if the lander isn't visible on the screen.
To fix this, click the Lander GameObject in the Hierarchy. In the Inspector, click Add Component, and then type Sprite Renderer in the search text field. Finally, choose the Sprite Renderer component.
Now, click the small circle icon next to the Sprite field in the component properties and select the playership sprite:

Set the Order in Layer to 1. More on this later!
Your next job is to assign the landing gear sprite.
Click the LanderFeet GameObject located under the Lander GameObject. Then, click the small circle icon next to the Sprite field in the Sprite Renderer component properties. Finally, choose the lander-feet sprite in the Select Sprite window, like so:

Click Play; you'll be able to see your Lander in the Game view. Use the WASD or arrow keys to fly around the screen:
Houston, we have liftoff!
If your lander is stopped by an invisible force, you could be trying to fly through an asteroid you can't see because of the aforementioned sprite sorting issue. For now, just keep exploring the parts of the universe you can reach (and see). :]
The 2D Camera and Pixels Per Unit
Unity 2D projects have an orthographic camera view by default. Generally, you'll want to stick with this in your 2D games instead of using the perspective camera view. You can learn more about the differences between these in the second part of our Introduction to Unity tutorial.
The image below shows the default camera configuration of the scene's Main Camera:

As noted above, the Projection property is set to Orthographic.
Select the playership sprite in the Project window and look at its Import Settings in the Inspector. The Pixels Per Unit property is currently set to the default value of 100:

So… what does 100 mean in this case?
A Word on Pixels Per Unit
Units in Unity don't necessarily correspond to actual pixels on the screen. Instead, you'll commonly size your objects relative to each other on some arbitrary scale such as 1 unit = 1 meter. For sprites, Unity uses Pixels Per Unit to determine their unscaled size in units.
Consider a sprite imported from an image that's 500 pixels wide. The table below shows how the width of GameObject on the x-axis would change as you render the sprite using different values for pixels per units at different scales:

Still not quite clear? The following scenario will help you think through what's going on with the unit conversion.
Think about a game that uses a static camera and displays the the backdrop sprite fullscreen, similar to the wallpaper on your computer desktop.
Assets/Sprites/backdrop.png is 2048 pixels tall, and it has a default pixel per unit ratio of 100. If you do the math, you'll find the the Backdrop GameObject in the Hierarchy will be 20.48 units tall.
However, the orthographic camera's size property measures only half the height of the screen, so to fit the exact height of the Backdrop GameObject to the screen in full view, you'd use an orthographic size of 10.24:
![]()
You don't need to change the camera in your project, however, as the current size of 5 works fine for the moving camera in your game.
A Galaxy To Be Proud Of
The Max Size property of the sprite's Import Settings lets you define a maximum size for your sprite, measured in pixels. You can override this setting for each platform you're planning to target.
Zoom in to your scene view backdrop on the light blue galaxy. Note that it's slightly blurry; when you import a sprite, the Max Size property defaults to 2048. Unity had to scale down your image to fit the default texture size, with a resulting loss of image quality.
To clear up your image issues, select the backdrop sprite in the Project window. Then, in the Inspector window, select the Override for PC, Mac & Linux Standalone Settings (the tab that looks like a computer monitor).
Next, check Override for PC, Mac & Linux Standalone, and change Max Size to 4096. Click Apply, and wait for a few moments as Unity imports the backdrop of your Scene View once again. You'll see the background suddenly become crisp and clear:

Setting Max Size to 4096 lets Unity use the full 4096 x 4096 texture so you can see the detail in the original image.
An Increase in Size
However, this fidelity comes at a cost. Check the Inspector's preview area shown below; the size of the background texture is now 4.0 MB, up from the previous 1.0 MB:

Increasing the size of the texture increased its memory footprint by a factor of 4.
It's also worth mentioning that there are override settings for the other platforms that Unity supports building against. You can use these override settings if you plan to build your games for other platforms and wish to set different size and format settings for them.
Note: 4096 x 4096 is a fairly large image file; try to avoid using this size when possible, especially for mobile games. This project uses a large image only as an example.
Textures
You can also change the Format of a texture, as shown below:

You might want to adjust the format of some textures to improve their quality or reduce their size, but this either increases the memory footprint of the image, or it lowers the texture fidelity. The best way to tweak these settings is to research how each one works, testing them out and comparing quality and size of the resulting texture.
Using a Crunched format allows you to set a crunch quality slider value. A crunch value of 50% takes a long time to compress, but it gives you the smallest possible file size, and you can tune this even further.
Set the backdrop Import Settings back to what they were before playing with the Format and crunch Compressor Quality settings. Then, click Apply.

When developing your own games, you'll need to play with the compression settings to find the combination that results in the smallest texture size that still gives you the quality you're looking for.
2D Colliders and Physics
Unity lets you adjust the gravity for the Physics 2D system just as you can in 3D games. Unity's default gravity settings for a new project are the same as Earth's gravity: by definition, 9.80665 m/s2. But you're landing your spaceship on the Moon, not Earth, and the gravity on the Moon is roughly 16.6% of Earth's, or 1.62519 m/s2.
Note: The gravity in your starter project was set to -1 to make it easy to fly around and test the game right away.
To modify the gravity of your game, click Edit ▸ Project Settings Then select the Physics 2D tab and use the Physics 2D panel to change the Y value of Gravity from -1 to -1.62519:

Things are about to get heavy!
Click Play to run the game; fly around a bit and see how the gravity changes the motion of your ship:

One small step up for gravity, one giant leap required for our thruster power!
Colliding With Objects
If you've already tried to navigate the Lander around the scene, you've likely collided with a rock or two. This is Unity's 2D collision system at work.
Every object that should interact with gravity and other physics objects requires a Collider 2D component and a Rigidbody 2D component.
Select the Lander GameObject in the Hierarchy.

You'll see a Rigidbody 2D and Polygon Collider 2D Component are attached. Adding a Rigidbody 2D component to a sprite puts it under control of Unity's 2D physics system.
A Quick Lesson on Physics Components
By itself, a Rigidbody 2D component means gravity will affect the GameObject it is attached to. It also allows you to control the entity from scripts using Physics2D related methods that apply forces to it.
But, if you want your sprite to interact and collide with other objects, you'll also need a Collider 2D component. Adding an appropriate collider component makes a sprite respond to collisions with other sprites.
Polygon 2D Colliders are more performance-heavy than other simple colliders such as the Box or Circle Collider 2D components, but they make more precise physical interaction between objects possible. Always use the simplest collider shape you can get away with in your game to ensure you achieve the best possible performance.
Colliding Polygons
Explore the collider on your spaceship by selecting the Lander GameObject in the Hierarchy and clicking Edit Collider on the Polygon 2D Collider:

Hover your mouse cursor over the collider edges in your scene view. Handles appear to let you move the collider points around, and you can also create or delete points to modify the shape of the collider:

Leave the shape of the Lander collider as is for now.
Note: The code in the Lander.cs script attached to the Lander GameObject uses OnCollisionEnter2D to handle collisions with other objects in the game scene. If the magnitude of the collision force is above a certain threshold, the lander will be destroyed.
Your landing pad also needs a collider; otherwise your spaceship would fall straight through when you tried to land!
In the Hierarchy, double-click the LanderObjective GameObject to focus on the landing pad. Using the Inspector, click Add Component and choose the Box Collider 2D component:

Unity adds a Box Collider 2D component to the LanderObjective GameObject and automatically sizes the collider to match the sprite size.

Cool!
A Few Other Things
There are a few other things to keep in mind regarding Rigidbody and 2D Collider components:
- Change Rigidbodies to use the Kinematic body type when you want to move your physics bodies via a transform component instead of only letting gravity affect them. To leave them under control of Unity's gravity, use Dynamic. If they won't be moving at all, set them to Static.
- You can also modify mass, linear drag, angular drag and other physics properties on your Rigidbody components.
- Colliders can be used in Trigger mode; they won't physically collide with other physics objects. Instead, they let your code react to an event using the
OnTriggerEnter2Dmethod available on all MonoBehaviour scripts. - To handle collision events in your script code, use
OnCollisionEnter2D, which is available on all MonoBehaviour scripts. - You can assign optional Physics2D Material 2D references to your Colliders to control properties such as bounciness or friction.
Note: You may not notice it when there are only a few objects in a game, but when you have hundreds of objects onscreen, all involved in physics interactions, using simpler collider shapes will improve the performance of your game.

You may want to re-think your strategy of using Polygon Collider 2D components if you have lots of objects colliding!
Lander Animation
Your lander wouldn't be complete without visible thrusters boosting out to counter gravity. Right now, the thrusters work, but there's no visual feedback to tell you they're firing.
Unity Animation 101
To assign an animation to GameObjects in your scene, attach an Animator component to the GameObject(s) you wish to animate. This component requires a reference to an Animator Controller that defines which animation clips to use and how to control these clips, along with other "fancier" effects such as blending and transitioning of animations.
An Animator Controller for Thrusters
In the Hierarchy, expand the Lander GameObject to reveal four other nested GameObjects. Select the ThrusterMain GameObject; you'll see it already has an Animator component attached, but it doesn't reference an Animator Controller:

With the ThrusterMain GameObject still selected, click the Animation editor tab. If you don't see this tab in the editor's main window, open it by selecting Window ▸ Animation ▸ Animation:

When you have a GameObject selected in the Hierarchy (which you do!), the Animation window will show animations related to that GameObject – just like the Inspector shows components related to that GameObject. Click Create to create an Animation Clip for ThrusterMain:

Enter the name ThrusterAnim and place it in the Assets / Animations folder.
You should now see two new animation assets in the Animations folder of the Project window. ThrusterAnim is the Animation Clip that will hold the animation for the thruster effect, and ThrusterMain is the Animator Controller that will control the animation:

You'll see an animation timeline in the Animation window; this is where you can place and order the individual thruster sprite frames.
Click Add Property and choose Sprite Renderer / Sprite as the type of property to animate:


Your editor should now look like this:

Time to work on the timeline
Working on the Timeline
In the Project window, click the Sprites folder and expand the thruster-spritesheet.png sprite. Highlight the four sliced thruster sprites and drag them onto the ThrusterMain : Sprite timeline in the Animation editor.
The sprite frames end up bunched together on the timeline; you can fix that yourself. Start with the rightmost sprite; click the sprite, drag it over to the right and space it roughly 0:05 apart from its neighbor:

Select the last frame at the 1:00 mark, and press Delete to remove it.

Click Preview in the Animation window, followed by Play. Focus on the Lander ship in the scene view to see a preview of your work!
Thusters Ready Captain!
With ThrusterMain still selected, you can also see the Sprite changing in the Sprite Renderer component:

Ticking over nicely :]
Now it's time to configure the animation controller.
Configuring the Animation Controller
The Lander.cs script currently sets animation parameters to true or false, depending on whether the player is firing the thrusters. The animation controller will evaluate these parameters and allow certain states to be entered or exited.
In the Project window, click the Animations subfolder. Then, double click ThrusterMain.controller. This opens the Animator editor, where you'll see the controller Unity added for you when you created the animation clip on the ThrusterMain GameObject:

Right now, the thruster animation is running continuously. Logically, the thruster animation should only run if the player is currently firing the thruster.
Right-click the grid area of the Animator editor, and click Create State / Empty:

Use the Inspector to name the new state NoThrust. This is the default state for the animation when there's no player input:

From Entry, the animator should flow directly to NoThrust and stay there until a Boolean parameter becomes true. For animation state changes to occur, you'll need to add connections using transitions.
Right-click NoThrust and click Set As Layer Default State. NoThrust should now appear orange as below, with the arrow from Entry now pointing to No Thrust:

The orange color indicates that the state will be the first state run.
Using the Animator editor, click + in the Parameters tab to create a new parameter type Bool. Name it ApplyingThrust:

Right-click NoThrust, click Make Transition, then click ThrusterAnim. This creates a transition that allows a state change between the two states. Now perform the same set of steps, but this time create a transition from ThrusterAnim to NoThrust:

Click the NoThrust to ThrusterAnim transition line, then click + in the Inspector to add a Condition. This selects the only condition available: ApplyingThrust.
Ensure true is selected in the drop-down. This indicates ApplyingThrust must be true for the animation to move to the ThrusterAnim state.

Now edit the transition line from ThrusterAnim to NoThrust to use the same ApplyingThrust condition. However, this time you're checking for the false condition:

You can tweak the animation playback speed in the Animator editor to suit. Click the ThrusterAnim state, and in the Inspector, change the Speed property to 1.5:

The thruster animation should react quickly to reflect the hairtrigger reactions from the player to appear responsive. Click both transition lines — the ones between NoThrust and ThrusterAnim — and use the Inspector to change the Transition-related settings to 0. Uncheck Has Exit Time and Fixed Duration as well:

Finally, apply the same animation and controller to the left and right thrusters. Select ThrusterLeft and ThrusterRight from the Hierarchy, then drag and drop ThrusterMain.controller from the Animations folder in the Project window to the Animator component's Controller property:

Click Play to run the game; try out your new thrusters out with the WASD or arrow keys:

Houston, we have lift off! :]
Sprite Sorting and Layers
No 2D engine would be complete without sprite-sorting abilities. Unity lets you sort and order sprites using a system of Layers and Order in layers.
Click Play in the Editor to run the game once again; use your worst piloting abilities to crash the lander into a nearby rock. Take a look at the Scene view in the Editor when the Restart button appears. You may notice some of the rocks have disappeared behind the backdrop image:

It may even be that you opened the starter project and could only see the background image. If that's the case, well done for making it this far!
The reason this happens is because the rendering engine can't decide the layering order of the sprites. All sprites, except for the ship, are currently set to use the default sorting layer with a rendering order of -1. Your graphics card will have been given all the draw calls to make, but not told what order to draw them in!
To fix this, you can use a system of Layers and Order in Layers to separate sprites. Unity will render sprites on these layers in the defined order of the layers. And for each individual layer, Unity will use the Sprite's Order in Layer numbering on each sprite to determine in which order it should render each sprite.
You can think of it as an ordered list:
- Layer A
- Order 0
- Order 1
- Layer B
Time to Add Some Layers
Click Edit ▸ Project Settings and choose Tags and Layers. Expand the Sorting Layers section.
Click + to add three new layers:
- Background
- Rocks
- Player
Click and drag the handles next to each layer to ensure they're ordered as listed above. The ordering of your layers here determines the order in which Unity will render sprites on these layers:
Just like an onion, space is made of layers too!
Click Backdrop in the Hierarchy; on the Sprite Renderer component, click the Sorting Layer drop-down, and choose Background from the list:

Now the rocks will definitely be behind the backdrop, because they're still on the Default layer!
Expand the Rocks GameObject and highlight all the child rock GameObjects. Use the Inspector to change the objects to use the Rocks Sorting Layer like so:

Since the rocks in your scene tend to overlap each other, they're helpful for demonstrating how the Order in Layer property works for sprites on a specific Layer.
If you didn't give each rock in the Rocks layer separate ordering values, you'd notice rocks randomly "popping" over others during gameplay. This is because Unity won't consistently render the rocks in the same order, since they all have the same Order in Layer at the moment.
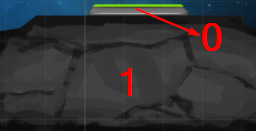
Look for overlapping rocks and assign the ones in the front a higher Order in Layer value than the rocks behind them:

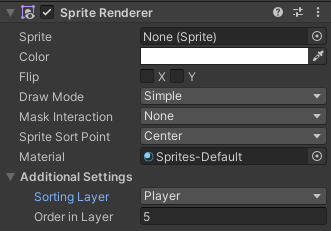
Click Lander in the Hierarchy and change the Sorting Layer properties for it's Sprite Renderer and all its child GameObject Sprite Renderer components to the Player Sorting Layer.
Do the same for the Fuel GameObjects under Pickups in the Hierarchy. This will ensure they're rendered in front of everything.
Fine Tuning Layers
However, there's one problem. What about the sprites for the thruster animations (and the lander's feet that normally hide behind the lander)? If you don't set a specific Order in Layer number for these and for the Lander itself, you'll see some odd rendering problems!
Change the Order in Layer property for the Lander itself to be 2. Select each Thruster child GameObject, as well as the LanderFeet GameObject, and set their Order in Layer values to 1.
When the lander touches down on the landing pad, the pad sinks down a little to show that you've landed. The landing pad and rock sprites overlap each other, so for the effect to look right, you'll have to order the landing pad behind the rock.
Change the LanderObjective sprite to use the Rocks layer, and assign it an Order in Layer value of 0. Set the rock underneath the LanderObjective to use a Order in Layer value of 1:
Finally, click the Explosion prefab in the Prefabs folder and change its Sorting Layer to Player:
Cool folks don't look at explosions. But we do!
Click Play and test your piloting skills by picking up fuel supplies and touching down on the landing pad. Just be careful not to apply too much thrust in any one direction so that you avoid the rocks!
Nailed it! :]
With enough practice, you'll be as good at landing rockets as Space X! :]
Where to Go From Here?
Download the completed project by clicking the Download Materials button at the top or bottom of the tutorial.
You've covered most of the important 2D design features of Unity, and you have a fun little gravity lander game to show for it!
Why not take your game to the next level by adding in a cool replay feature? Follow along with this Creating a Replay System in Unity tutorial to learn how.
Or, if you'd like to try some more in-depth 2D animations and sprite effects, why not check out the Unity 2D Techniques: Build a 2D Pinball Game tutorial?
We hope you enjoyed this tutorial. If you have any questions or comments, please join the forum discussion below!
Source: https://www.raywenderlich.com/11409307-introduction-to-unity-2d#:~:text=In%20a%20nutshell%2C%20Sprites%20are,workflow%20and%20built%2Din%20editor.&text=That's%20all%20it%20takes!,both%202D%20and%203D%20scenes.
0 Response to "Is Unity Easy to Use for 2d"
Post a Comment